- Club Caddie
- Tee Sheet
- Customer Management
-
Troubleshooting
-
General
-
Settings
- 3P Integrations
- Card Connect
- Clover
- POSLink
- Class Management
- Class Rate Management
- Course User Info
- Day End Closing
- Event Settings
- Floor Plan
- General Course Info
- I-Frames
- Inventory Center
- Manage Roles
- Membership Settings
- Mobile App Builder
- Payroll Center
- Punch Card Type Center
- Register Settings
- Rack Rate Management
- Tax Management
- Tee Sheet Settings
- Terminal Management
- Venue Center
-
Support
-
Register
-
Tee Sheet
-
Starter Sheet
-
Activities
-
Events
-
On Demand
-
Customers
-
Members
-
Vouchers
-
Sales
-
Reports
-
Quickbooks
-
Hardware
-
Mobile App
-
Email Marketing
-
KDS (Kitchen Display System)
-
Video Training
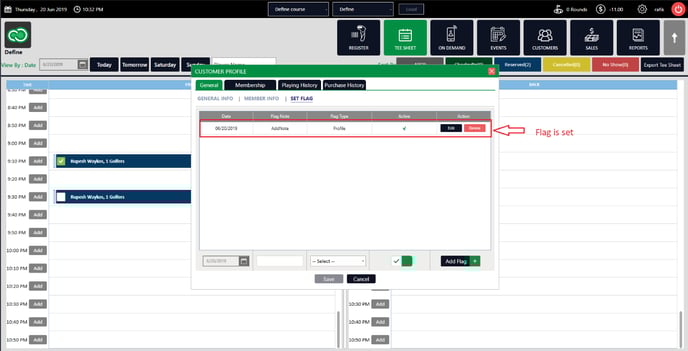
Tee Sheet : Set Customer Flags
Article Contents: This article summarizes how to set a flag on a customer account
Step by StepStep 1: From the tee time reservation pop up, you will see a plus (+) icon to the left of the Last Name field and under the “Add” column. If they are a new customer, you can click add to quickly add them to your customer database.
Step 2: Once all information is filled out, you can assign the customer to a class (i.e., senior, junior/military, PGA, etc), or you can begin a membership.
Step 3: If a membership is started, a member number will automatically generate, or you can create your own.
Step 4: Select the membership that applies to that class and click save.
Step 5: Click on "Set Flag" tab.
Step 6: Select date, add note, and click "Add Flag" button.
Note: All Flags Report
