- Club Caddie
- Settings
- Register Settings
-
Troubleshooting
-
General
-
Settings
- 3P Integrations
- Card Connect
- Clover
- POSLink
- Class Management
- Class Rate Management
- Course User Info
- Day End Closing
- Event Settings
- Floor Plan
- General Course Info
- I-Frames
- Inventory Center
- Manage Roles
- Membership Settings
- Mobile App Builder
- Payroll Center
- Punch Card Type Center
- Register Settings
- Rack Rate Management
- Tax Management
- Tee Sheet Settings
- Terminal Management
- Venue Center
-
Support
-
Register
-
Tee Sheet
-
Starter Sheet
-
Activities
-
Events
-
On Demand
-
Customers
-
Members
-
Vouchers
-
Sales
-
Reports
-
Quickbooks
-
Hardware
-
Mobile App
-
Email Marketing
-
KDS (Kitchen Display System)
-
Video Training
Settings : Register Settings : How to enable loyalty points
Article Contents: This article gives step-by-step instructions on how to enable loyalty points.
Step by StepStep 1: Click the settings icon (gear wheel) in the upper right hand corner of Club Caddie. Select "Register Settings" from the left hand menu.
Step 2: Click the "Loyalty" tab to see the loyalty settings.
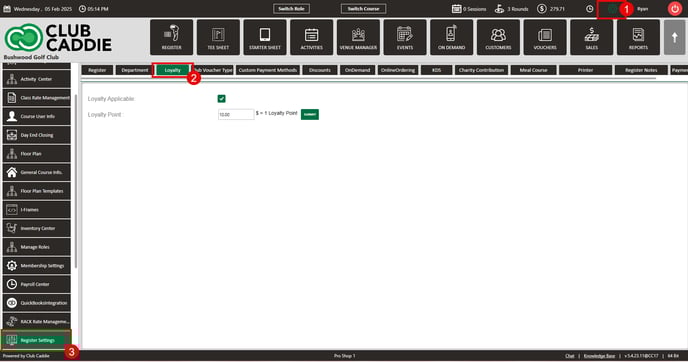
Step 3: To enable the loyalty points, you'll want to ensure the loyalty points applicable box is checked. Next, you'll set a dollar amount value that the customer needs to spend in order to receive a loyalty point. Click Submit.
Example: If you enter in $10, that means that for every $10 spent, the customer will receive 1 loyalty point.