- Club Caddie
- Events
-
Troubleshooting
-
General
-
Settings
- 3P Integrations
- Card Connect
- Clover
- POSLink
- Class Management
- Class Rate Management
- Course User Info
- Day End Closing
- Event Settings
- Floor Plan
- General Course Info
- I-Frames
- Inventory Center
- Manage Roles
- Membership Settings
- Mobile App Builder
- Payroll Center
- Punch Card Type Center
- Register Settings
- Rack Rate Management
- Tax Management
- Tee Sheet Settings
- Terminal Management
- Venue Center
-
Support
-
Register
-
Tee Sheet
-
Starter Sheet
-
Activities
-
Events
-
On Demand
-
Customers
-
Members
-
Vouchers
-
Sales
-
Reports
-
Quickbooks
-
Hardware
-
Mobile App
-
Email Marketing
-
KDS (Kitchen Display System)
-
Video Training
Events : Event Tracking
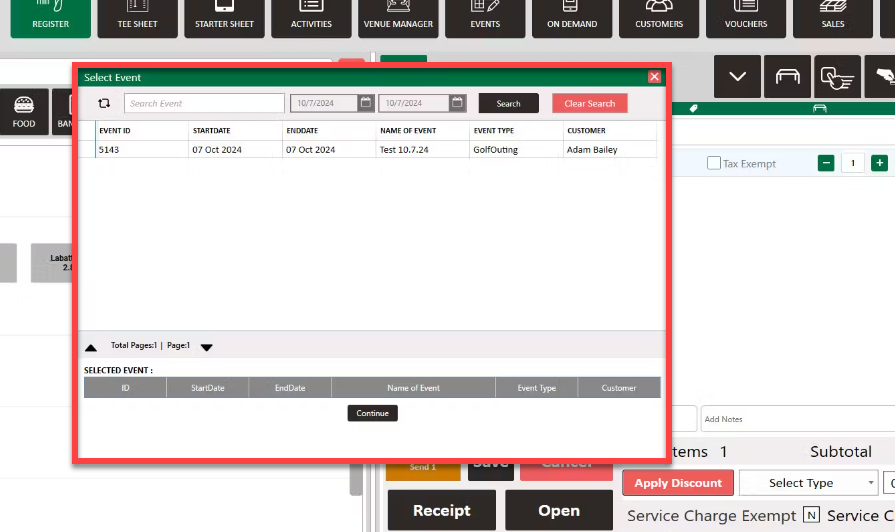
Article Contents: This article explains how to utilize the Event Tracking feature in the Event Module. For the day of the event, if the terminal selected as shown below, each transaction in the register will have a pop up asking if you would like to
Step by step:
Step 1: Click on the Events module along the top row. Then, select your event to open up the Event Builder.
Step 2: Click on the Event Tracking tab. Then, select the drop down of terminal locations and check what boxes you want to track transaction for this event.
Step 3: Now for the day of the event, on the terminal selected, each transaction in the register will have a pop up asking if you would like to track that transaction to the event.
You can view these transactions in the Event Module as well as the Event Tracking Report.